
Nissan Micra: Headlight aim
Nissan Micra Owners Manual

The aim of the headlights may require adjustment when replacing the headlight assembly or when the vehicle’s front body has been repaired. When the adjustment is required, follow these procedures, or have them adjusted by a NISSAN dealer.
Before performing the headlights aim adjustment:
- Check the pressure of all tires for the correct inflation pressure.
- Check that the tools and spare tire are stowed securely.
- Check that the fuel and lubricants levels are filled to correct capacities.
- Unload all luggage and other items, which may influence the vehicle’s height level.
- Load a weight on the driver’s seat that is equivalent to the weight of a driver.
Stopping the vehicle
- Park the vehicle on a level surface vertical to the wall or screen to which the headlights will be projected.
- Move the vehicle close to the wall to determine
the point P as shown in the illustration.
The point P must be: “H” is the distance between the headlight’s center point to the level surface.
“WL” is the distance between the left and right headlights’ centers.
- Mark point P on the wall or screen.
- Back up the vehicle 5,000 mm (197.0 in,
16.4 ft) straight away from the wall or
screen.
”L” is the distance between the wall or screen to the vehicle’s front bumper.
- Apply the parking brake.
Adjusting the headlight aim
Be sure that the vehicle is parked directly vertical to the wall on which the headlights will be projected.
- Turn on the headlight low beam
- Open the hood.
- Turn the aiming adjustment screws 1 2 , located inside the engine compartment, until the headlight projection, on the wall or screen, does not move.
NOTE: The aim adjustment screws are located on each side of the headlights. The lower screw 1 is used to adjust the horizontal aim. The upper screw 2 is used to adjust the vertical aim.
The screws can be turned indefinitely in each direction. Therefore be sure to observe the headlight projection movement to determine the necessary turning amount.
- Turn the lower screws 1 in the opposite
direction until the headlight projection becomes
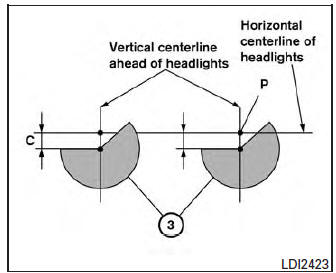
70 mm (2.76 in) below the point P.
Once the left headlight has been adjusted, perform right side adjustment as well.
”C” is the distance between point P and point 3 .
- Turn the upper screws 2 in the opposite direction until the horizontal headlight projection’s turn point 3 is directly below the point P. Once the left headlight has been adjusted, perform right side adjustment as well.


Other info:
Mazda 2. Seat Belt Pretensioner and Load Limiting Systems
For optimum protection, the front seat
belts and rear outboard seat belts * are
equipped with pretensioner and load
limiting systems. For both these systems to
work properly you must wear the seat ...
Mazda 2. Seat Belt Precautions
Seat belts help to decrease the possibility of severe injury during accidents
and sudden
stops. Mazda recommends that the driver and all passengers always wear seat
belts.
Front seat and rear ou ...
Renault Clio. Special features of petrol versions
The following operating conditions:
driving for long periods when the low
fuel level warning light is lit;
using leaded petrol;
using fuel or lubrication additives
which are not approved.
...
Manuals For Car Models
-
 Chevrolet Sonic
 -
 Citroen C3
 -
 Fiat Punto
 -
 Honda Fit
 -
 Mazda 2
 -
 Nissan Micra
 -
 Peugeot 208
 -
 Renault Clio
 -
 Seat Ibiza
 -
 Skoda Fabia